Inventory Maintenance
Covers BOM Groups, Categories, Dangerous Goods, Docks, Facilities, Facility Groups, Formulators, Item Pictures, Item Planners, Item Search 1-5, Location Types, Locations, Part Exclusions, Reason Codes, Sub-Categories, Units of Measure and Zones
BOM Groups
Bill of Material (BOM) Groups, selectable on BOM Lines within Bills Of Material, allow users to distinguish different BOM lines by group and is used for end user organizational and sorting purposes. Users with access to the "Inventory -- maintenance" setting will have the ability to create or modify BOM Groups.
System Navigation
- Inventory > Maintenance > BOM Groups
Edit BOM Group form
Opened via the "New" or "Modify" buttons on the BOM Groups form.
Field/Flag |
Description |
Name |
Name of the BOM Group, which must be unique. |
Active |
If checked, this record is active. Only active records may be used in the system. |
Categories
Inventory Categories allow companies to group items that share similar characteristics and are useful for inventory reporting. In addition, inventory Categories are one of the criteria for Deal Pricing, Promotions and Commissions in the Sales Maintenance area of Deacom. Only one category may be assigned to an inventory item. The categories list can contain an infinite number of entries.
System Navigation
- Inventory > Maintenance > Categories
Edit Category form
Opened via the "New" or "Modify" buttons on the Categories form.
General tab
Button/Field/Flag |
Description |
Features |
If clicked, displays the Features form, which is used to manage sales features applicable to this Category. Features, used in connection with the Deacom Product and Sales Configurator, are a group of similar options that may be chosen or configured based on different sales choices. |
Name |
Displays the name of the inventory category, which must be unique. |
Sales Quota |
Displays the planned annual sales in dollars for this Category. This field is available for use in the Sales > Order Reporting Ranking report. |
Active |
If checked, this record is active. Only active records may be used in the system. |
Default |
If checked will provide the default entry when creating new inventory items. |
Restricted Selling |
If checked, indicates this is a restricted Category. Restricted selling may be used in a few different ways.
|
Deacom allows the creation of user-defined fields that, once created are available in various master data records, such as Items, Vendors, Ship-To-Comapnies and many others. These fields allow companies to enter and store information outside of the fields provided in the system. User fields can also be used in connection with User Calculations to and are available for printing on the majority of Part Forms and Report Layouts throughout the system.
Units tab
The Units tab allows companies to define the number of minutes required per unit to receive and ship items in the selected category and is used in conjunction with the Dock calendar to schedule orders.
- Note: Unit Minutes may also be defined on individual Units of Measure, Item Masters, and Sub-Categories, allowing companies to define a hierarchy for the minutes that will be required for receiving and shipping.
Button/Field/Flag |
Description |
Unit Of Measure |
Select an appropriate Unit of Measure from the drop down list. |
Receiving Minutes |
Numeric field used to define the minutes required to receive the Unit of Measure when receiving items in the specified Unit Of Measure that are assigned to this Category. |
Shipping Minutes |
Numeric field used to define the minutes required to ship the Unit of Measure when shipping items in the specified Unit Of Measure that are assigned to this Category. |
Features form
Opened via the "Features" button on the Edit Category form. Displays a list of the Features that have been added to the Category.
Button |
Description |
Add |
If clicked, opens the Edit Feature form and allows the user to select a Feature.
|
Overrides |
If clicked, opens the Feature Overrides form, which displays a feature tree of this Category and all available options and prices, with the capability of overriding pricing and availability.
|
Inclusions |
If clicked, opens the Feature Inclusions form, which displays a list of the inclusions and exclusions that have been added to the current Feature. |
View Tree |
If clicked, displays a feature tree of the selected Feature and all attached options and prices, which can be printed or exported to Excel. |
Edit Feature Override form
Opened via the "Modify" button on the Feature Overrides form, which is opened via the "Overrides" button on the Features form.
Field/Flag |
Description |
Feature |
Displays the name of the selected Feature or Endpoint. |
Override Price |
If checked, allows the user to modify the pre-defined Price of the selected Feature or Endpoint. |
Price |
Only available when the "Override Price" flag is checked. Allows the user to define a new Price for the selected Feature or Endpoint. |
Override Status |
If checked, allows the user to modify the availability of the selected Feature or Endpoint. |
Status |
Only available when the "Override Status" flag is checked. Pick list used to modify the availability of the selected Feature or Endpoint. Options are:
|
Override Commission |
If checked, allows the user to edit the "Commissionable" flag of the selected Feature or Endpoint. |
Commissionable |
Only available when the "Override Commission" flag is checked. Allows the user to modify the selected Feature or Endpoint to be eligible for Commissions. |
Start Date |
The date the override begins taking effect. |
End Date |
The date the override expires. |
Containers
In Deacom, Containers represent storage units that hold inventory. Once inventory lots have been moved to Containers, inventory transactions can be performed by referencing the Container instead of the lots inside. This allows inventory to be moved more easily and means fewer transactions. In addition, Containers, like Work Centers, can be depreciated as a fixed asset and have maintenance performed on them via MRO.
System Navigation
- Inventory > Maintenance > Containers
Edit Container form
Opened via the "New" or "Modify" buttons on the Containers form.
Field/Button |
Description |
Post Depreciation to G/L |
If clicked, allows users to Post Depreciation for all the selected container in a single click. Details on how the system handles the posting of depreciation to the General Ledger is available in the Fixed Assets tab section below. |
General tab
Field/Flag |
Description |
Number |
Enter appropriate number |
Part Number |
Option to link a part number to the selected container. Only active part numbers with the "Unit Serialization" property checked will be displayed in the list.
|
Unit |
Select the appropriate Container unit. |
Tare Weight |
Enter the appropriate tare weight for the selected Container. Tare weight represents the empty weight of the Container. |
Active |
Check to make the Container active. Only active Containers may be used in the system. |
User Fields tab
Deacom allows the creation of user-defined fields that, once created, are available on various master data records such as items, Vendors, and Ship-to Companies. These fields allow companies to enter and store information outside of the fields provided in the system. User fields may be added via Tools > Maintenance > User Fields.
Fixed Assets tab
Field/Flag |
Description |
Acquired |
Enter the date the Container was acquired. |
Acquisition Cost |
Enter cost at time of acquisition. |
Depreciation |
Pick list used to select the method with which depreciation costs are posted. Options are:
|
Account |
Account to which depreciation charges will be credited. The corresponding entry is a debit to the "Depreciation Expense" account Accounting > Options. |
Months |
Indicates the useful life, in months, for this Container. |
Current Cost |
Displays the current cost for this Container. This field will display the "Acquisition Cost" if "Depreciation" is set to "None". If set to "Straight Line", this field will display as a linear interpolation from the "Acquisition Cost" to zero, based on the "Acquired Date". |
Last Posted Cost |
Displays the last depreciation cost for the Container that was posted to the GL. |
Maintenance tab
The maintenance tab allows for the setup of routine maintenance tasks for the Container and is integrated into MRO Management.
Maintenance form
Opened via the "Add" or "Modify" buttons on the Maintenance tab of the Edit Container form.
Field/Flag |
Description |
Name |
The name for the repair or maintenance task associated to the selected Container. |
Recurring Type |
Pick list used in connection with the "Frequency" field to specify the unit of when maintenance will be performed on the Container. Options are:
|
Frequency |
Provides the interval indicating how many days, hours, or how much usage is allowed between maintenance task completion. |
Schedule Type |
Only used with a "Recurring Type" of "Calendar Days". Pick list used to specify the basis of how recurring maintenance tasks, based on the number of Calendar Days specified, will be rescheduled. Options are:
For example, assume a maintenance task is set on the Maintenance tab of a Container with a "Recurring Type" of "Calendar Days", a "Frequency" of "7", and the "Schedule Type" is set to "Created Date". Assume a Maintenance Job is created on Monday, Sept 7th. If an MRO report is run, the "Due" column for this Maintenance task will be set to Monday, Sept 14th. Likewise, if the "Schedule Type" was set for "Completion Date" and the same Job was completed on Wednesday, Sept 9th, then running the MRO report would indicate that the "Due" column for this maintenance task would be set to Wednesday, Sept 16th. |
Initial Date |
Indicates the first date that the system should consider when scheduling maintenance for this Container. When a value is entered and MRO is run, if a Maintenance task has never had a Job finish against it, the system will use this date as the last Job finish date instead of an empty date. When a date is entered in this field, the "Last Date" in MRO gets updated with this same date. If no Jobs have been created for a Maintenance task with a "Recurring Type" of "Calendar Days" previously, then the Initial Date will be set as the "Initial Date" + "Frequency" days. |
Day Of |
Only used with a "Recurring Type" of "Calendar Days" and used in conjunction with the "Day" field. Pick list used to indicate how the maintenance task due date should be snapped on a calendar when using MRO. Options are:
|
Day |
Only used with a "Recurring Type" of "Calendar Days" and used in conjunction with the "Day Of" field. The value entered in this field indicates the specific day of the month or week (depending on the "Day Of" selection) that the MRO calendar will snap to when scheduling maintenance tasks. The system begins a week with Monday, so with "Day Of" set to "Week", a "Day" set to "1" represents Monday and a "Day" set to "7" represents Sunday. |
Part Number |
Search field used to select the non-stock item that represents the maintenance or repair activity associated with the selected maintenance task. |
MRO Group |
Search field used to assign the maintenance task to a group. MRO Groups, managed via Production > Maintenance > MRO Groups allow maintenance tasks assigned to the same group to be placed together on the same Job when creating the Job via MRO. |
Unavailability Level |
Pick list used to select what impact this maintenance task will have on a machine's or location's availability. Options are:
When Maintenance Jobs are scheduled for maintenance tasks that contain an "Unavailability Level" other than "None", the Master Production Calendar will black out the appropriate Work Centers, Shop Areas, and Facilities to indicate that they will be unavailable while maintenance is performed. |
Priority |
Used for scheduling purposes and to provide the default value when creating Maintenance Jobs via MRO. Tasks may be set with priorities starting from 1 to an unlimited number, with 1 being the highest priority and 5 being the default. If multiple tasks are set on one Container, the tasks are scheduled according to the value entered in their respective "Priority" fields. |
Max Meter Reading |
Used in connection with the "Meter Reading" flag. Indicates the point at which the meter will roll over when entering meter readings on Job lines that include a Container with a recurring type of "Metered". This field allows the system to calculate the difference before the meter rolled over to estimate when the next reading should occur. |
Copy Document Category |
Search field used to copy any documents attached to the Container (via the "View Docs" button on the Edit Work Center form) over to MRO Jobs created for this maintenance task. The documents must belong to the selected Document Category (selected when initially attaching the documents to the Container) to be copied to the Job. The documents can be used as part of the batch ticket record for the Job and may be viewed via the "View Docs" button on the Job. |
Notes |
Memo field used to store additional details or instructions for IT/Dev/Support MRO tasks. |
Meter Reading |
Used in connection with the "Max Meter Reading" field. When finishing a Maintenance Job for a task with a "Recurring Type" of "Metered" or this "Meter Reading" flag checked, the "Finish Quantity" field on the Input Production and Close/Relieve Job forms becomes the "Meter Reading" field to enter the current meter value. In addition, The MRO report looks for the last meter reading for each Container compared to the meter reading when the last Metered task was performed to estimate when the next Metered task should be performed. Notes:
|
Dangerous Goods Form
The Dangerous Goods maintenance table is used to support the Deacom FedEx integration and the ability to ship goods that are considered dangerous. Once dangerous goods have been identified and added to this table, the Item Master record needs to have the Dangerous Good associated with it indicated on the General tab. Additionally, the Facility(s) from which Dangerous Goods will be shipped need to contain an Emergency Contact Phone Number.
When shipping Sales Orders, the system allows users to select a Dangerous Good on the package lines via the Add Package Line form. The default Dangerous Good is the one specified on the Item Master record, but users may override this default when necessary. Additional information on the Deacom FedEx® integration is available via the Shipping with FedEx and UPS page.
System Navigation
- Inventory > Maintenance > Dangerous Goods
Edit Dangerous Good form
Opened via the "New" or "Modify" buttons on the Dangerous Goods form.
Field/Flag |
Description |
---|---|
Name |
Displays the name of the Dangerous Good. |
Regulatory ID |
Enter appropriate number. |
Proper Shipping Name |
Memo field. The name required to ship a dangerous good. These names are pre-defined by US DOT and IATA. As a result, there can be different Proper Shipping Names for ground versus Air shipments. Proper Shipping Name must be EXACTLY what FedEx requires including capitalization and punctuation. The current best practice for this field is as follows: In instances where the Proper Shipping Name is different for ground versus air, add multiple Dangerous Good entries one for air, one for ground. On the package line detail, you can choose a different Dangerous Good option. |
Technical Name |
This field is the technical/chemical name of the specific item being shipped. This name should be on the item master and is the reason for the naming best practice listed above. |
Hazard Class |
Pick list used to select the Hazard Class to which the good belongs.
|
Subsidiary Risk |
If a material contains a hazard in addition to the primary hazard, it is specified using this field.
|
Packing Group |
Choose the correct packing group associated with the dangerous good. Options are I, II, III, and None. |
Packing Instructions |
Search field used to select the necessary details regarding the packaging of dangerous goods for use with the FedEx integration.
|
Notes |
Long memo field used to store the details regarding the selected dangerous good. This field may be added to print outs associated with the shipment of dangerous goods in Deacom, such as the Bill of Loading.
|
Active |
If checked, the record is active. Only active records may be used in the system. |
Docks
Docks represent the locations where items will be shipped and/or received. In Deacom, Docks are used in conjunction with the Dock Calendar and are assigned to a specific Facility. Once created, Docks may be selected on either Purchase Orders, Sales Orders, or both, depending on the Transaction Type assigned to the Dock. After a Facility has been selected on the Sales or Purchase Order, only Docks associated to the appropriate Facility are available for selection.
As an example of how Docks work, if a company has a "Dock A" and it is assigned to the "Philadelphia" Facility and has a "Transaction Type" of "Receipts", then the Dock will be available for selection only when adding or modifying a Purchase Order in the Philadelphia Facility, and not when adding or modifying a Sales Order in the Philadelphia Facility.
System Navigation
- Inventory > Maintenance > Docks
Edit Dock form
Opened via the "New" or "Modify" buttons on the Docks form.
Fierld/Flag |
Description |
Name |
Displays the name of the Dock. |
Facility |
Search field used to select the Facility to which the Dock belongs. |
Facility Group |
Search field used to select the Facility Group to which the Dock belongs. |
Transaction Type |
Pick list used to determine how the Dock will be used in the Facility specified. Options are:
|
Active |
If checked, the dock is active. Only active docks may be used in the system. |
Facilities
Facilities define unique or separate locations that concentrate resources such as workers, machinery, and other capital. Facilities are not limited to production centers and may refer to a distribution or holding location or a specific segment of a company's operations, such as a corporate accounting department, point of sale location, or order fulfillment center.
In Deacom, the Facility master record does much more than store a name and address; the record may contain general ledger posting information specific to the Facility as well as various other inventory and transaction type settings. In addition, the Facility name and address can be printed on reports and documents throughout the system so that print outs may indicate where materials are being stored, shipped from, or produced.
Facilities may be used in a few different ways, including:
- Transfer Facilities - Used for Inter-Company Transfers, where items are transferred from one Facility to another, within the same company. If a Transfer Facility is specified on a Ship-to Company record, new Sales Orders created for that Ship-to will automatically be defaulted to an Order Type of "Inter-Company Transfer".
- Hold Facilities - Used in transfer and hold purchasing situations, a Hold Facility may be specified on a Ship-to Location.
- Invoicing Facilities - Used for Cross-Facility Orders, where items are shipped from one Facility but invoiced out of another. If an Invoice Facility is specified on a Ship-to Company record, new Sales Orders created for that Ship-to will automatically be defaulted to an Order Type of "Cross-Facility".
- When running a facility-filtered version of MRP, and there is a suggestion for an item that is not marked as manufacturable in that facility, Deacom will not go through the contents of the BOM of this item and won't show demand for the BOM ingredients of that item as it cannot be manufactured in that particular facility.
System Navigation
- Inventory > Maintenance > Facilities
Edit Facility form
Opened via the "New" or "Modify" buttons on the Facilities form.
General tab
Field/Flag |
Description |
Name |
Displays the name of the Facility, which must be unique. |
Street |
First line of the Facility address. |
Street 2 |
Optional second line of the Facility address. |
City, State, Zipcode, Country |
City, State, Zipcode, and Country of the Facility. |
Phone |
Primary phone number for the Facility.
|
Country Code |
Search field used to select a Country Code phone mask for the Facility, if required. |
Global Location Number |
Displays the GLN for the Facility, if required.
|
Currency |
Search field used to select a Currency other than the default that will be used to book transactions that occur for this Facility.
|
Fax |
Displays the Facility facsimile machine number, if known. |
Emergency Contact |
Character text field. Displays the name of the individual to contact in case of an emergency. |
Negative Inventory |
Pick list used to select the conditions in which items purchased, produced, or sold in this Facility are allowed to go negative. This selection overrides the default selection on the Item Master General 1 tab. Options are:
|
Print Substitutions |
Search field used to select a Print Substitution Group for forms printed when this Facility is used. |
Active |
If checked, this record is active. Only active records may be used in the system. |
Default |
If checked, the selected Facility will be defaulted whenever a transaction or record contains a "Facility" field. |
Prevent Inventory Transactions |
If checked, inventory transactions other than physical inventory postings (such as issues, reserves, and moves) will be prevented from occurring for this Facility.
|
Transfer Hold Lot Control |
If checked, the system will enforce lot control when performing the second receipt of a Transfer Hold Purchase Order process. This means that users will only be able to select and receive lots that were received into the Hold Facility during the first receipt in the process.
|
APIs tab
Note:
Sales tab
Field/Flag |
Description |
IC Xfer Markup Type |
Pick list used to select how inventory lots will be costed when received via Inter-Company Transfers into this Facility or when invoicing from this Facility when using Cross-Facility Orders. For Inter-Company Transfers, the current lot cost of material being transferred is not automatically used to determine the cost of material that is received into the receiving Facility. For example, assume an item has a list price of $5.00 specified on the Item Master Costs 2 tab, but that there is inventory of this item in "Plant A" with a lot cost of $7.00. If the Facility tab of "Plant B" has a Markup Type of "List Plus $" and nothing is specified in the "Markup Factor" field, the lot of the transferred item will be costed at $5.00 and not $7.00 when lots of this item are transferred and received into "Plant B" via the use of an Inter-Company Transfer. Also, when receiving an Inter-Company Transfer using any Markup Type other than "Ship and Hold", the Invoice Date on the order will populate with the Receipt Date. For Cross-Facility Orders, the Markup Type needs to be set on the invoicing Facility, and lots are costed when the Cross-Facility Order is shipped. Options are:
|
Markup Factor |
Defines the percentage or dollar amount that will be applied when receiving material on Inter-Company Transfers or shipping material via Cross-Facility Orders and using an "IC Xfer Markup Type" other than "Item Master Transfer Cost" or "Ship and Hold".
|
Incremental Reserve |
Pick list used to allow or restrict reserving incremental inventory within this Facility while using WMS. Incremental reserving was added for customers that need the ability to track and report lots as they are issued incrementally in Deacom and not just the total "rolled up" amounts or issued materials/lots. For example, if a Sales Order requires 170 pounds of sugar, and sugar is handled in 50 pound bags, a user would stage three bags and 20 pounds of loose sugar in a container. For some customers, seeing the sugar listed as 170 pounds on the Sales Order is acceptable; other customers may have process controls that demand they track the exact containers and increments and thus would want 4 lines of sugar on the order for 50, 50, 50, and 20 pounds, respectively. Options are:
|
ICT Receipt Qty |
Pick list used to determine how multiple Lots of the same Part are handled when receiving material on an Inter-Company Transfer. Options are:
|
Automatically Receive ICT |
If checked, Inter-Company Transfers sent to this Facility will be received automatically.
|
Allow Inter-Co. Transfer To Facility |
If checked, this Facility may receive material shipped on Inter-Company Transfers. |
Retain Inter-Co. Transfer Location |
If checked for the receiving Facility on an Inter-Company Transfer, the system will keep the material in the same Location and Location Type as it originated from the shipping Facility. If the same Location and Location Type do not exist for the receiving Facility, the receiving Facility defaults will kick in.
|
Custom Part First When Reserving ICT in WMS (requires WMS license) |
If checked, ensures the lot picker for a custom part automatically opens when reserving an ICT in Reserve SO in the Warehouse Management System. If the option is un-checked and an inter-company transfer has one or more stocked parts, the form defaults to the first part in the part list and a lot picker does not automatically open (similar behavior to reserving to a normal sales order). |
Finish Linked Job Upon Shipment |
If checked, the quantities shipped from this Facility on Inter-Company Transfers, regular Sales Orders, and Cross-Facility Orders are automatically finished on the linked header or line Job.
|
Ship on Save (requires WMS license) |
Sets the default value for the "Ship on Save" flag on the Reserve SO form in WMS.
|
Don't Require Lot Tracking on DSD |
If checked, the system will not require that a specific lot be selected when shipping Sales Orders from this Facility using the Direct Store Delivery application. Instead, the system will use FIFO rules to select the lots for lot tracked items. |
POS Default Bill-to (requires POS license) |
Search field used to select a Bill-to Company, assuming this Facility represents a location where the Point of Sale application is used. When entering an order via POS, if the Bill-to selected is also specified in this field of a Facility, that Facility will automatically populate on the order. |
CC Processor |
Search box for all active Credit Card Processors, to select which Processor should be used for this facility when calculating sales tax information. In terms of credit card processor hierarchy, this field overrides the System Default, but not the the Bill-To Company Override. The hierarchy is:
This field was added to support companies that have different Merchant IDs in different Facilities. |
Default Shipping Qty |
Pick list that determines the default shipping quantity at the facility level, which takes priority over the System options but still below Item level. Options include:
Example: An order for 2 or 3 boxes of chocolates which will require the users to begin with zero quantity then make and weigh the three packages prior to generating labels and completing the shipping process. Additional information on the FedEx process is available via Shipping with FedEx and UPS. Note: The General 2 tab on the item master record also contains a Default Shipping Qty field. If the field in the item master is set to "Default," the system will use the Default Shipping Qty option set here in System Options. If the item master has a different setting than "Default," the system will use the specified option only when shipping sales orders containing that item. |
Retain Lot Costs on IC Xfer |
If checked, the lot will be received into the facility at the current cost, with no markup added to the inventory value.
|
Override Tax Jar Address with Facility |
If checked, will switch the facility and ship to locations when using TaxJar AND the state on the facility/ship to are the same. |
Prompt When Over Reserving |
If checked, users will always be prompted with a yes/no prompt to confirm that they are over reserving/staging material on Sales Orders in this Facility.
|
Production tab
Field/Flag |
Decription |
Production Relief |
Pick list used to determine how lots issued to WIP Jobs, or moved to Shop Areas, will be relieved during production. Options are First Expired and First Issued.
|
Incremental Issue |
Pick list used to allow or restrict issuing incremental inventory within this Facility while using WMS. Incremental issuing was added for customers that need the ability to track and report lots as they are issued incrementally in Deacom and not just the total "rolled up" amounts or issued materials/lots. For example, if a Job requires 170 pounds of sugar, and sugar is handled in 50 pound bags, a user would stage three bags and 20 pounds of loose sugar in a container. For some customers, seeing the sugar listed as 170 pounds on the Job is acceptable; other customers may have process controls that demand they track the exact containers and increments and thus would want 4 lines of sugar on the Job for 50, 50, 50, and 20 pounds, respectively. Options are:
|
Default Issue Quantity |
Pick list used to determine how the system will populate the default issue quantity for this Facility, on issuing forms in the main application and WMS and in the "Quantity" field on the Inventory Final Staging form. Options are:
Notes: If set to "Full", the system will apply either the full requirements or all of the item available based off the set Location/Lot filters. |
Prompt When Over Issuing |
If checked, users will always be prompted with a yes/no prompt to confirm that they are over issuing/staging material on Jobs in this Facility.
|
Restrict Operations to Routings in Log On/Off Jobs |
If checked, users will only be able to select Operations specified on the Job's Routing when Logging On/Off Jobs in the WMS application and in the main application via the Production > Payroll Entry transaction. |
Prompt When Under Issuing |
If checked, users will always be prompted with a yes/no prompt to confirm that they are under issuing/staging material on Jobs in this Facility.
|
Group By Part Number When Issuing |
If checked, BOM lines will be grouped by Part Number on the Issue/Reserve Inventory form when issuing to a Job in the selected Facility.
|
Facility Groups tab
Facility Groups are mainly used for reporting purposes and to restrict a user's access to only orders and transactions for Facilities contained in the Facility Group. Facilities may be assigned to multiple Facility Groups and Users may be restricted to a specific group by following the steps outlined in Managing Users and User Security.
GL Overrides tab
GL overrides by Facility is the behavior where inventory transactions can override the GL code affected, based on the Facility in which the transaction is being performed. This allows some or all Facilities to use different GL codes, if desired. GL Overrides are populated from the Chart of Accounts form, accessible via Accounting > Maintenance > Chart of Accounts.
Restricted Selling tab
Items with Inventory Categories, Sub-Categories, and/or Item Search 1-5 fields marked true for "Restricted" are not available for sale unless specifically designated. The Restricted Selling tab on the Edit Facility form allows items with restrictions or restricted Categories/Sub-Categories/Item Search 1-5 to be assigned, therefore making them available for sale from the selected Facility.
Tax Regions tab
The Tax Regions tab is used to establish regions that will be used whenever this Facility is selected during Sales Order entry. Ship-to records and Zipcodes may also contain Tax Regions, but these choices will be overridden by the Facility setting. There is no limit to the number of Tax Regions that can be set. More information on this feature is available via Managing Customers Using Tax Regions. Additionally, Deacom now offers the ability to use a TaxJar or AvaTax integration. These services allow companies to automate sales tax calculations and auto file state taxes.
Deacom allows the creation of user-defined fields that, once created are available in various master data records, such as Items, Vendors, Ship-To-Comapnies and many others. These fields allow companies to enter and store information outside of the fields provided in the system. User fields can also be used in connection with User Calculations to and are available for printing on the majority of Part Forms and Report Layouts throughout the system.
Print Destinations tab
Print Destinations allow companies to set the printers to which Part Forms and Report Layouts will print without requiring the user to select from a list. Print Destinations are also useful in situations where companies will have multiple printers associated to a production "line" or specific packaging area. For example, a company may have 2 printers in the line 1 and line 2 packaging rooms printing the same labels. 1 printer is a label printer printing a 4x6 case labels and 1 printer will be a sheet printer printing an 8x11 skid sheet. Once Print Destinations have been created, they may be assigned to the appropriate Facilities using this tab.
Facility Groups
Facility Groups are mainly used for reporting purposes and to restrict a user's access to only orders and transactions for Facilities contained in the Facility Group.
System Navigation
- Inventory > Maintenance > Facility Groups
Edit Facility Group form
Opened via the "New" or "Modify" buttons on the Facility Groups form.
Field/Flag |
Description |
Name |
Displays the name of the group. |
Active |
If checked, this record is active. Only active records may be used in the system. |
Default |
If checked, this Facility Group is the default selection when assigning a group to a Facility. |
Features
A Feature is a group of similar, usually mutually exclusive, Endpoints (or Options). For example, a house might have a single space for a refrigerator, and the buyer could choose to have a 16 cubic foot, 18 cubic foot, or 20 cubic foot refrigerator in the space. The refrigerator is considered a Feature, while the three choices of 16, 18, and 20 are considered Endpoints or Options. Features can also be members of higher level Features, so that an upper level Feature of Kitchen can have sub-features of Refrigerator, Range, and Garbage Disposal, with each of those having a list of available Endpoints. The configuration choices are presented on the Sales Order as a Feature Tree, showing top level Features, their component Features (possibly multiple levels), and finally the Endpoints.
Features are used in connection with the Deacom Sales Configurator, which is an agreement between sales, production, and engineering/design as to which options are available on each model, which options do not work with other options, which options or packages include other options, and the costs of options on various models. In Deacom, Sales Configurator definition begins with the creation and linking of Features and Endpoints, and then is further defined at the Category, Sub-Category, and Item Master levels. The desired end result is that the correct options are available for each configured item, with proper sales pricing. Detailed information on the use of the Sales Configurator is available via Building Sales Orders with the Product Configurator.
Additionally, Features may have inclusions and exclusions defined. Inclusions are cases where the selection of an Endpoint in one Feature automatically selects another Endpoint in another Feature.
- One example is a package, like a Deluxe Kitchen, that includes a list of lower level Endpoints, usually at no charge beyond the option price of the package.
- Another example is an individual endpoint, such as 15” tires, which need to include 15” wheels to work properly. Inclusions do not necessarily exclude other choices, they just change the default. If the choice of 15” tires includes the standard set of 15” steel wheels, another choice of 15” aluminum alloy wheels might also be possible.
If certain choices for an Endpoint such as 15" tires should not be possible, like 14” or 16” wheels, then Exclusion rules need to be used to prevent their selection. Exclusions are cases where the selection of an Endpoint in one Feature is incompatible with another Endpoint in another Feature, and should prevent its selection.
- The incompatibility can be functional, as in 15” tires that exclude the selection of 16” wheels, or relatively arbitrary, as in a deep pile carpet that excludes the selection of thin padding.
- Exclusion rules in Deacom are one way, meaning that a rule that says A excludes B does not inherently mean B excludes A. If B should exclude A, then a second Exclusion rule should be added
System Navigation
- Inventory > Maintenance > Features
Features form
The Features form contains two pick lists, "Active" and "View", used to determine what records are displayed in the form. The "Active" pick list provides the options of Active, All, or Inactive and the "View" pick list provides the options of All, Endpoints, and Features. This form also contains three buttons, "Add Feature", "Add Endpoint", and "Modify", used to open the Edit Feature and Edit Endpoint forms.
Edit Endpoint form
Opened via the "Add Endpoint" or "Modify" buttons on the Features form.
Field/Flag |
Description |
---|---|
Name |
Displays the name of the Endpoint, which must be unique.
|
Quantity |
Used to store the default quantity of the selected Endpoint, which is usually 1, that will be added to the configuration when this Endpoint is selected. |
Price |
Used to store the default sales price of the selected Endpoint. |
Part Suffix |
Field used to dictate the suffix, up to 10 characters, that the Sales Configurator should use to build and link to part numbers.
|
Notes |
Memo field used to store notes about the selected Endpoint, which will be copied into the resulting configuration on the Sales Order, if this Endpoint is selected. |
Active |
If checked, this record is active. Only active records may be used in the system. |
End Point |
If checked, this record is considered an Endpoint, as opposed to a Feature. |
Commissionable |
If checked, the sales price of this Endpoint is subject to Commission calculation rules. |
Apply Deal Pricing |
If checked, the sales price of this Endpoint is subject to modification by Deal Pricing rules.
|
Apply Promotion Codes |
If checked, the sales price of this Endpoint is available as a basis for Promotions calculations. |
Edit Feature form
Opened via the "Add Feature" or "Modify" buttons on the Features form.
Field/Flag |
Description |
---|---|
Add |
If clicked, opens the Edit Option form, used to attach a specific Part Number directly to a Feature, and optionally mark it as default, when the use of multiple Endpoints is not necessary. Otherwise, Endpoints can be linked to Item Masters in a way that the selection of several Endpoints brings a single Item Master, and its Bill of Materials, into the configuration. |
Add Options |
If clicked, opens a mover form used to add a collection of Features or Endpoints to the current Feature.
|
View Tree |
If clicked, displays a feature tree of the selected Feature and all attached options and prices, which can be printed or exported to Excel. |
Inclusions |
If clicked, opens the Feature Inclusions form, which displays a list of the inclusions and exclusions that have been added to the current Feature. More information is available in the Edit Inclusion/Exclusion form section below. |
Name |
Displays the name of the Feature, which must be unique. |
Quantity |
Used to store the default quantity of the selected Feature, which is usually 1, that will be added to the configuration when an Endpoint of this Feature is selected. |
Active |
If checked, this record is active. Only active records may be used in the system. |
End Point |
If checked, this record is considered an Endpoint, as opposed to a Feature. |
Multiple Selection |
If checked, this Feature allows the selection of multiple Endpoints.
|
Commissionable |
If checked, the sales prices of the Endpoints of this Feature are subject to Commission calculation rules. |
Apply Deal Pricing |
If checked, the sales prices of the Endpoints of this Feature are subject to modification by Deal Pricing rules.
|
Apply Promotion Codes |
If checked, the sales price of this Endpoint is available as a basis for Promotions calculations. |
Required |
If checked, the selection of an Endpoint is required when selecting this Feature.
|
Edit Inclusion/Exclusion form
Opened via the "Add" or "Modify" buttons on the Feature Inclusions form, which is opened via the "Inclusions" button on the Edit Feature form.
Field/Flag |
Description |
---|---|
Parent Feature |
Pick list used to select the Parent-level Feature. Options include the sub-Features that are a part of the current Feature (all records with a value of "No" in the "EndPoint" column of the Edit Feature form). |
Parent Value |
Pick list used to select the Parent-level Endpoint. Options include the Endpoints that are a part of the sub-Feature selected in the "Parent Feature" pick list. |
Child Feature |
Pick list used to select the Child-level Feature. Options include the sub-Features that are a part of the current Feature (all records with a value of "No" in the "EndPoint" column of the Edit Feature form). |
Child Value |
Pick list used to select the Child-level Endpoint. Options include the Endpoints that are a part of the sub-Feature selected in the "Child Feature" pick list. |
Exclusion |
If checked, this record is handled as an Exclusion.
If not checked, this record is handled as an Inclusion.
|
Include At No Cost |
If checked, when a user is building a Sales Order and selects the Endpoint defined in the "Parent Value" field, the Endpoint defined in the "Child Value" field will be added to the same order at no additional cost. |
Formulators
Formulators are used to indicate the name of individuals or departments responsible for conceiving and maintaining item formulas and bills of materials revisions in Inventory > Bills Of Material. Formulators can be restricted to only have access to view and modify revisions assigned to them. Users with access to the "Inventory -- maintenance" setting will have the ability to create or modify formulators.
System Navigation
- Inventory > Maintenance > Formulators
Edit Formulator form
Field/Flag |
Description |
Name |
The Name of the Formulator or responsible department, which must be unique. |
Active |
If checked, this record is active. Only active records may be used in the system. |
Default |
If checked, this will be the default Formulator on forms throughout the system that contain a "Formulator" field. Users may override the default if necessary. |
Item Pictures
Item Pictures allow the identification of Parts by graphical pictures when using the Point of Sale application and when listed as Saleable Parts on configured eCommerce Sites. First, graphic files representing individual items are uploaded to the Item Pictures maintenance table. Then, individual Parts are modified and the appropriate image file is selected in the "Item Picture" field on the Item Master General 2 tab. Once POS Buttons are created and assigned to a Category, they will display in the POS application. In POS, clicking this Category's button will display icons for all items in that Category. Those items that have an Item Picture assigned will display the graphic image as well as the Part's name and description, otherwise only the Part information will be listed and the rest of the icon will appear blank. If no POS Buttons are configured, when selecting an item via the "Add Part" button, all Parts will be displayed in a list format rather than using icons.
This feature is only available in web versions of Deacom.
System Navigation
Inventory > Maintenance > Item Pictures
Edit Documents form
Button/Field |
Description |
---|---|
Add |
If clicked, opens the Edit Document Entry form, used to add a new picture record. |
Modify |
If clicked, opens the Edit Document Entry form, used to modify the selected record. |
Delete |
If clicked, deletes the selected record. |
View |
If clicked, opens the picture selected. |
Send Email |
If clicked, opens a mover form used to select one or more records to attach to an email. |
Edit Document Entry form
Opened via the "Add" or "Modify" buttons on the Documents form.
Field |
Description |
---|---|
Name |
Search field that opens a file explorer used to select the item picture. Displays the actual name of the image. |
Description |
Displays a description of the image. |
Document Category |
Search field used to select the appropriate Document Category for the item picture. |
Print Destination |
Option to specify a printer where the attached file will be printed instead of the printer defined in the "Print Destination" field on the Report Layout or Part Form.
|
Item Planners
Item Planners are created then assigned to the appropriate Parts on the Item Master General 1 tab. The "Item Planner" is a pre-filter in many Inventory reports, so that a Planner can see only the items that he or she is responsible for, within or across Categories. Only one planner may be assigned to an item. In addition, users may be restricted by Item Planner so that they will only be able to see items that contain the Item Planner to which they are assigned. The Item Planners list can contain an infinite number of entries. Users with access to the Inventory Maintenance menu will have access to add and modify Item Planners.
System Navigation
- Inventory > Maintenance > Item Planners
Edit Item Planner form
Opened via the "New" or "Modify" buttons on the Item Planners form.
Field/Flag |
Description |
Name |
Displays the name of the Item Planner, which must be unique. |
Active |
If checked, this record is active. Only active records may be used in the system. |
Default |
If checked, the selected Item Planner will be the default when adding new items via Item Master. |
Item Search 1-5
Deacom offers five user-defined Item Search fields that can be used to define additional criteria for Item Master records. Captions for these fields are defined in System > Maintenance > Captions and field selections are made on the Item Master User Fields tab for each Part. These Item Search fields are available on the Inventory Reporting pre-filter to assist with searching and analyzing items and for printing on inventory forms such as Item Master labels, Formulas, and Batch tickets. In addition, these fields are one of the criteria for Deal Pricing, Promotions, and Commissions. These fields are required and must have at least one default entry each. Companies not wishing to use these fields on Item Master records may enter a default value of "None". Users with access to the Inventory Maintenance menu will have access to add and modify selections.
System Navigation
- Inventory > Maintenance > Item Search 1-5
Edit Item Master User form
Opened via the "New" or "Modify" buttons on the Item Search 1-5 forms.
General tab
Field/Flag |
Description |
Name |
Displays the name of the option, which must be unique. |
Active |
If checked, this record is active. Only active records may be used in the system. |
Default |
If checked, the selected option is the default for the "Item Search 1-5" fields on the User Fields tab when adding new Parts via Item Master. |
Restricted Selling |
If checked, indicates this is a restricted Item Search field. Restricted selling may be used in a few different ways. |
Deacom allows the creation of user-defined fields that, once created are available in various master data records, such as Items, Vendors, Ship-To-Comapnies and many others. These fields allow companies to enter and store information outside of the fields provided in the system. User fields can also be used in connection with User Calculations to and are available for printing on the majority of Part Forms and Report Layouts throughout the system.
Location Types
Location Types define and link the types of Locations available in each of the existing Facilities. Each Location Type requires a unique name and those that exist in multiple Facilities, like Tanks and Racks, should be given names that tie to the Facilities in which they are located. Users with access to the Inventory Maintenance menu will have access to add and modify Location Types. Rules for re-naming existing Location Types follow the same rules as Locations in that Deacom drives from the Location Type ID and not the name.
System Navigation
- Inventory > Maintenance > Location Types
Edit Location Type form
Opened via the "New" or "Modify" button on the Location Types form.
General tab
Field/Flag |
Description |
Name |
Defines the name of the Location Type, which must be unique. |
Negative Inventory |
Pick list used to set negative inventory options this level. Options are: Always, Follow Part, Never, Once.
|
Facility |
Search field used to select the Facility to which this Location Type will belong. When changing the Location Type's Facility on this form and saving the form, the system will check to see if there is any inventory with the location type still associated to it. If there is, the system will display the following prompt: "This location type cannot change facilities while there is still inventory associated with it." |
Active |
If checked, this record is active. Only active records may be used in the system. |
Default |
If checked, this Location Type will populate when the Facility selected in the field above is identified on forms requiring a Location Type. |
Prevent Inventory Transactions |
If checked, posting or relieving of inventory will be prevented for this Location Type (and therefore the corresponding Locations within this Location Type), with the exception of physical inventory postings.
|
Deacom allows the creation of user-defined fields that, once created are available in various master data records, such as Items, Vendors, Ship-To-Comapnies and many others. These fields allow companies to enter and store information outside of the fields provided in the system. User fields can also be used in connection with User Calculations to and are available for printing on the majority of Part Forms and Report Layouts throughout the system.
Locations
Locations are used throughout the system to indicate both where inventory is located and where items will be placed as a result of various inventory actions, such as receiving a Purchase Order or finishing production on a Job. On all forms where inventory is put away into Locations, a pair of search fields for Location Type and Location will be displayed and must be filled in by the user. The default values for these search boxes may come from the Item Master General tab or the Facility Part Cross Reference (if one exists), if these tabs contain values, or the records flagged as default. Users with access to the Inventory Maintenance menu will have access to create and modify Locations. Rules for re-naming existing Locations follow the same rules as Location Types in that Deacom drives from the Location Type ID and not the name.
System Navigation
- Inventory > Maintenance > Locations
Edit Location form
Opened via the "Add" or "Modify" buttons on the Locations form. Note that the Locations form contains a display field with options to select Active, Inactive, of Both Locations.
General tab
Field/Flag |
Description |
Name |
Displays the name of the Location, which must be unique.
|
Description |
Displays a description of the Location. |
Location Type |
Search field used to select the Location Type to which this Location belongs.
|
Capacity Unit (requires WMS license) |
Search field used to define the Unit used to measure the Capacity quantity, with the most common usage being cubic feet.
|
Capacity (requires WMS license) |
Defines the maximum quantity of inventory that the Location can hold.
|
Replenishment Min. |
Used in conjunction with Movement Rules to dictate when a Location is considered for replenishment. Priority for Location replenishment is determined by the sort rules on the rule used. |
Location Sequence |
Determines the sequence the system will use when determining where material should be placed or selected from when issuing.
|
Last Count |
Displays the date that inventory in this Location was last counted, via the posting of a Physical Inventory Worksheet, at any Facility, regardless of how many Facilities may be linked via the Item Master Facilities tab.
|
Active |
If checked, this record is active. Only active records may be used in the system.
|
Default |
If checked, this Location will be default for the Location Type specified. This default will populate when the appropriate Location Type is identified on forms requiring a Location entry. |
Prevent Inventory Transactions |
If checked, posting or relieving of inventory will be prevented for this Location, with the exception of physical inventory postings.
|
Deacom allows the creation of user-defined fields that, once created are available in various master data records, such as Items, Vendors, Ship-To-Comapnies and many others. These fields allow companies to enter and store information outside of the fields provided in the system. User fields can also be used in connection with User Calculations to and are available for printing on the majority of Part Forms and Report Layouts throughout the system.
Movement Rules
Movement rules are used to define how inventory will be picked and what in order when handling location replenishment for sales order fulfillment.
System Navigation
Inventory > Maintenance > Movement Rules
Movement Rule form
Edit Movement Rule form
Opened via the "Add" or "Modify" button on the Movement Rule form.
Button/Field |
Description |
---|---|
Rule Name |
Enter appropriate name. |
Transaction Type |
Choose Location Replenishment or Sales Order |
Facility |
|
From Zone |
|
Active |
Check to make the rule active. |
Require Specific Sales Order |
|
Sort Rule Add form
Opened via the "Add" or "Modify" button on the Edit Movement Rule form.
Button/Field |
Description |
---|---|
Sort By |
|
Expression |
Available when selecting a Sort By value of "User-defined." |
MRP Groups
MRP Groups may be assigned to items that share similar characteristics via the Item Master MRP tab. This feature is designed so that when the "Create Job" button is used in MRP, all items belonging to the same MRP Group will be added to the same production Job.
- This feature should not be used if the "Create Separate MRP Job" flag is checked on a Part's Item Master Properties tab.
- If all items are selected and the "Create Job" button is used, all items without an MRP Group will be placed together on a single Job.
System Navigation
- Inventory > Maintenance > MRP Groups
Edit MRP Group form
Opened via the "New" or "Modify" buttons on the MRP Groups form.
Field/Flag |
Description |
Name |
Displays the name of the MRP Group |
Active |
If checked, this record is active. Only active records may be used in the system. |
Part Exclusions
Part Exclusions may be used to prevent users from selecting and selling items from certain Facilities or to certain Customers during Sales Order entry. Part Exclusions set at the Facility level take precedence over those set at the customer level and only block the sale of items and not the manufacture and purchase of items.
Users with access to the Inventory Maintenance menu will have access to create and modify Part Exclusions. The security setting "Sales orders -- override restricted selling" overrides the Part Exclusion block and allows users to both view and select items assigned to Part Exclusions. In this case, the system will display a prompt indicating the Part is assigned to a Part Exclusion and ask the user if they wish to continue.
System Navigation
- Inventory > Maintenance > Part Exclusions
Edit Part Exclusion form
Opened via the "New" or "Modify" buttons on the Part Exclusions form.
Field/Flag |
Description |
Name |
Displays the name of the Part Exclusion, which must be unique. |
Active |
If checked, this record is active. Only active records may be used in the system. |
Put Away Rules
*Access to this form requires the WMS license.
Companies can use Put Away Rules to dictate how inventory can be physically put away in a warehouse. These rules may then be used for a company to automatically determine the nearest suitable Location in which they can put away a given item. Utilizing the Put Away Rule framework, companies will be able to create a rule for a given Part Number, choose specified Location overrides (if they need to stack an item lower than a Location would normally allow, for instance), specify the sort methodology they wish to use, set Existing Inventory to Same Part Number so that only like parts may go together in a non-empty Location, set Lot Number to Same so that only like Lots may go together in a non-empty Location, etc.
Additional features allow companies to apply this rule to not just a single Part, but to a Sub-Category, Category, Item Search 1-5 field, or all Parts for easy setup. There is also the ability to allow/disallow placing an item in a Location based on the Inventory Segment or QC Status of items already in place. These rules will apply real-time in the WMS system and once set up, require no intervention from the user other than an item scan.
Once the fields of the form are set - specifically, the "To Type" and "Facility/Location/Location Type" fields - the Location Sort section of the form will populate with the Locations deemed valid by the warehouse hierarchy defined in the system. For example, if a Put Away Rule is configured for a Facility, then the rule will apply to all Locations that belong to that Facility. If a Put Away Rule is configured for a specific Location, then the rule will only apply to that Location, but not be limited to only that Location within one Facility or Location Type. This is helpful in situations where one Location, such as a Freezer, exists in multiple Facilities, and the same Put Away Rule should apply to all Freezers.
Put away location suggestion logic
Once Put Away Rules are created, the put away location suggestion logic fundamentally consists of checking a Location for suitability with a number of disqualifying tests. Once Deacom finds a Location to potentially use, and if that Location passes all tests, then it is used as the put away location. If it fails any test, then the logic proceeds to the next possible Location and repeats the tests. A visual representation of this process is also included for reference. Note: For all sorting behaviors described below, Locations are first sorted by the Location Sequence number. If there is a tie, they are then sorted by the Location's Name.
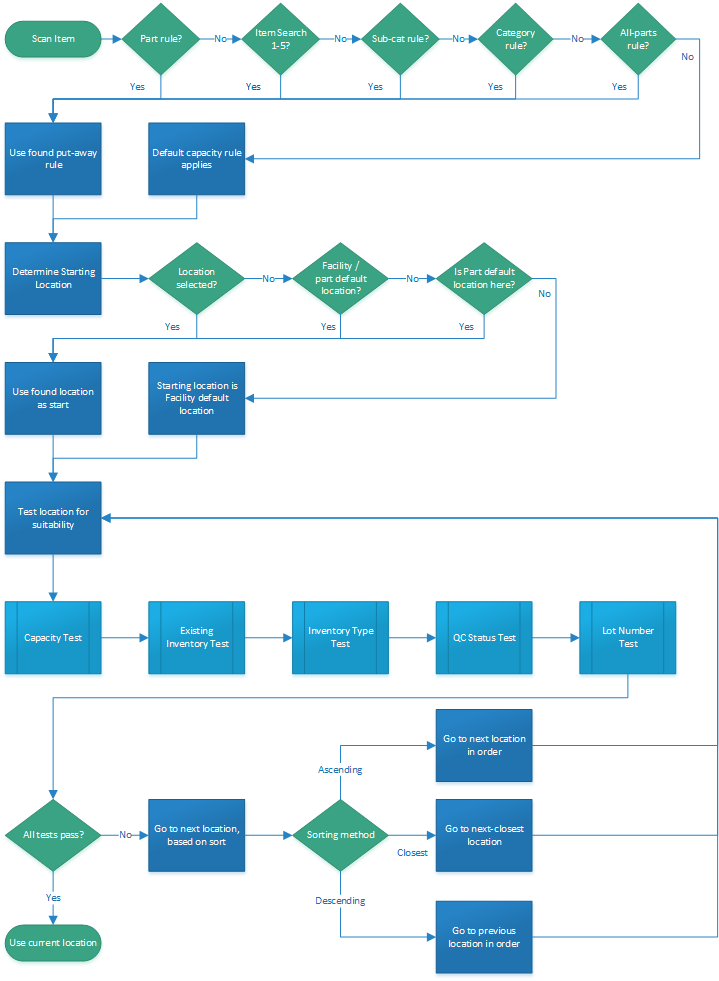
Location suitability check
- Check for relevant rule:
- The system determines if there is a relevant Put Away Rule specifically for the Part Number being put away (i.e. a Put Away Rule with a "For Type" of "Part Number" and "For" with that Part Number's ID). If such a rule exists, it is used.
- If no such rule exists, the system looks for a Put Away Rule for the Part Number's Item Search 1-5 field (i.e.a Put Away Rule with a "For Type" of one of the Item Search 1-5 fields and with that fields Item Search ID). If such a rule exists, it is used.
- If no such rule exists, the system looks for a Put Away Rule for the Part Number's Sub-Category (i.e. a Put Away Rule with a "For Type" of "Sub-Category" and "For" with that Part Number's Sub-Category ID). If such a rule exists, it is used.
- If no such rule exists, the system looks for a Put Away Rule for the Part Number's Category (i.e. a Put Away Rule with a "For Type" of "Category" and "For" with that Part Number's Category ID). If such a rule exists, it is used.
- If no such rule exists, the system looks for a Put Away Rule for "All Part Numbers". If such a rule exists, it is used.
- If no such rule exists, the system follows the logic in "Default Behavior" described below.
- Determine starting Location:
- If the form being used to move/receive material contains a "Location" field that is populated, the Location is used.
- If no such field exists, the system checks for Locations in the Location Sort section of the Put Away Rule. If one or more are found, the Location with the lowest Sequence number is used.
- If no such records exist, the system looks for the "Default Location" selected on a Facility Part Cross Reference for the Facility and Part selected, if one exists. If one is found, it is used.
- If no such records exist, the system looks for the "Default Location" selected on the Part's Item Master General 1 tab. If one is specified and belongs to the current Facility, it is used.
- If no such default exists, the system looks for the current Facility's default Location Type then looks for that Location Type's default Location. That Location is then used as the starting Location.
- Default Behavior (no applicable Put Away Rule was found):
- The system finds the closest Location with available capacity. Beginning with the starting Location, the system determines if that Location has enough available capacity. If it does, that Location is used as the recommended put away location.
- If that Location does not have sufficient capacity, the system checks the Location one below the starting Location. If that Location has enough available capacity, it is used.
- If that Location does not have sufficient capacity, the system checks the Location one above the starting Location (therefore two above the previous Location checked). If that Location has enough available capacity, it is used.
- If that Location does not have sufficient capacity, the system continues with the following pattern, where "start" indicates the starting Location: [start], [start] -1, [start] + 1, [start] -2, [start] + 2, [start] -3, etc. until a suitable Location is found and returned.
- If no suitable Location is found, the system will prompt the user.
- Directed Put Away Behavior (an applicable Put Away Rule was found):
- The system finds the closest Location with available capacity. Beginning with the starting Location, the system determines if that Location has enough available capacity. If it does, that Location is used as the recommended put away location.
- If that Location does not have sufficient capacity, the system uses the "Sort" pattern selected on the Put Away Rule (described in the "Sort" field description below) to check each Location from the relevant list of Locations found for sufficient capacity.
- Determine list of relevant Locations:
- If there are Locations listed in the Location Sort section of the Put Away Rule being used, those records and corresponding Sequences are used as the list of relevant Locations. If one or more are found, the Location with the lowest Sequence number is used.
- If there are no Locations listed in the Location Sort section of the Put Away Rule being used, the system uses the list of active Locations, found in Inventory > Maintenance > Locations, and their corresponding "Location Sequence" values.
- When each Location is checked, all of the following disqualifying tests are run. If the Location passes all tests, it is used as the recommended put away Location. If not, the system continues on to the next Location using the above logic.
Disqualifying tests
- "To" test:
- If this Location resides within the "To" place as defined in "To Type" and "To" fields on the Put Away Rule, then this test passes.
- "Capacity" test:
- If "Capacity Type" is set to "Amount" on the applicable Put Away Rule, then use the capacity values from that rule for the Location Capacity for the calculation specified below.
- If "Capacity Type" is set to "Percent", then multiply the "Capacity" defined on the Location record by the "Capacity" value defined on the rule and divide by 100. Use this value for the Location Capacity.
- If "Capacity Type" is set to "From Location", then use the maximum capacity of the Location for this test, defined by the "Capacity" field on the Location record: Take everything already in this Location, and convert the item quantities to the Location's defined "Capacity Unit", then sum. Location capacity minus this value is remaining capacity. Determine capacity value of quantity to be put away by converting capacity units. If this value is less than or equal to remaining capacity, then the material can be placed in this Location and this test passes.
- "Existing Inventory" test:
- If "Existing Inventory" is set to "Any" on the applicable Put Away Rule, then this test passes.
- If "Existing Inventory" is set to "None", then this Location only passes if it has no inventory in it already.
- If "Existing Inventory" is set to "Same Category", then this Location only passes if (1) all inventory already in it belongs to the same Category as the Part Number being put away or (2) it is empty.
- If "Existing Inventory" is set to "Same Sub-Category", then this Location only passes if (1) all inventory already in it belongs to the same Sub-Category as the Part Number being put away or (2) it is empty.
- If "Existing Inventory" is set to "Same Part", then this Location only passes if (1) all inventory already in it is the same Part as the Part Number being put away or (2) it is empty.
- "Inventory Type" test:
- If "Inventory Type" is set to "Any" on the applicable Put Away Rule, then this test passes.
- If "Inventory Type" is set to "Same", then this Location only passes if (1) all inventory already in it is part of the same inventory segment as the Part Number being put away (2) it is empty.
- "QC Status" test:
- If "QC Status" is set to "Any" on the applicable Put Away Rule, then this test passes.
- If "QC Status" is set to "Same", then this Location only passes if (1) all inventory already in it has the same QC Status as the Part Number being put away or (2) it is empty.
- "Lot Number" test:
- If "Lot Number" is set to "Any" on the applicable Put Away Rule, then this test passes.
- If "Lot Number" is set to "Same", then this Location only passes if (1) all inventory already in it has the same Lot Number as the Part Number being put away or (2) it is empty.
- If all tests pass, then return this as the recommended put away location. If not, the system continues on to the next Location using the logic described earlier.
System Navigation
- Inventory > Maintenance > Put Away Rules
Edit Put Away Rule
Opened via the "New" or "Modify" buttons on the Put Away Rules form.
Button/Field/Flag |
Description |
Same As |
Allows the user to use a previously created Put Away Rule as a base for a new one. |
For Type |
Pick list used to determine to what the rule applies. Options are:
|
Category/Part Number/Sub-Category/Item Search 1-5 |
Search field used to select the applicable Category, Part Number, Sub-Category or Item Search 1-5 that this rule applies to.
|
To Type |
Pick list used to determine where the rule applies.
|
Facility/Location/Location Type |
Search field used to select the applicable Facility, Location, or Location Type that this rule applies to.
|
Capacity Type |
Pick list used to determine if the rule is subject to a specific capacity, and if so whether the capacity limit is amount from location, a specific absolute amount for this rule, or a percentage of total location maximum capacity.
|
Capacity Unit |
The Unit in which the "Capacity" is measured, when "Capacity Type" is set to "Amount". |
Capacity |
The specific absolute amount or percentage of total location maximum capacity that may be consumed by the material. |
Active |
If checked, this record is active. Only active records may be used in the system. |
Fill Partial Location Prior To Empty Location |
If checked, the system will look for and suggest to fill a location that meets both of the two criteria below.
In this case, the system will attempt to fill the location to capacity before trying to fill closer locations. This flag is unchecked by default. |
Sort |
Pick list used to determine how Locations are sorted when the system is iterating through the options to suggest one for use. Options are:
|
Existing Inventory |
Pick list used to determine if the material being received/moved can be mixed in with other Parts, or segregated based on Category, Sub-Category, etc. Options are:
|
Inventory Type |
Pick list used to determine if the material being received/moved can be mixed in with material classified as a different Inventory segment. Options are:
|
QC Status |
Pick list used to determine if the material being received/moved can be mixed in with material classified as a different QC status. Options are:
|
Lot Number |
Pick list used to determine if the material being received/moved can be mixed in with material labeled with a different Lot Number. Options are:
|
Sort |
Allows the user to sort the order in which the available Locations, as listed in the Location Sort section of the form, are suggested when a user is putting away inventory. |
Quality Control Groups
Quality Control is a major method of providing process control within Deacom. Quality Control ensures that required Quality Control Tests are performed when Raw Materials are received on Purchase Orders, when Finished Goods are produced on production Jobs, and when previously sold products are returned. Quality Control is an optional feature with a wide array of applications ranging from completely turned off to extremely strict requirements, and is established on an item by item basis. This means that some items can have absolutely no quality control, while others can have many required QC tests.
Quality Control Tests are required to do QC testing. The Quality Control Test describes the base name of the test as well as any applicable testing methods and the Unit of Measure that should be used for testing. Quality Control Groups are a list of sequenced Quality Control Tests for the group to perform. QC Groups can be attached to a Part's Item Master to indicate testing required upon PO receipt or on a Bill of Materials to indicate testing required prior to, or following, finishing of material on a production Job. If two items have identical QC Tests and allowable results, they can share the same QC Group. If two items have different QC Tests or different allowable results, they would each have a different QC Group. A system can have as few as one QC Group, or as many QC Groups as there are items, or anything in between. Items may also have multiple QC Groups assigned based on different testing levels. For example, all Raw Materials may be assigned a basic QC Group, with a certain sub set of Raw Materials being assigned an additional QC Group on the Item Master record to ensure these materials undergo additional QC testing requirements.
Quality Control Security Groups are assigned to each Quality Control Test when the test is added to a Quality Control Group. User Groups are then assigned to QC Security Groups using Quality Control Group Security. This grid must be updated whenever a new Quality Control Security Group or User Group is created to ensure the new group has appropriate access. Specific test protocols and security for entering QC data are configured via Quality Control Groups and security for who can enter QC values is configured via Quality Control Security Groups. Additional system security is required to perform functions such as creating or modifying QC Tests and QC Security Groups.
QC approval process and security options
Quality control results may be entered without requiring approval before users may click the "Finish QC" button and place items into regular inventory or failed QC inventory. The QC approval process involves the ability to review and indicate final approval for those QC groups that require this check and also the ability to approve individual QC results that are out of spec for manufactured items. Several different security options and features are available to ensure QC results are validated.
General QC approval
The ability to require QC approval is determined by the "Approval Type" field on the QC Group. If this field is set to any value other than "None", a separate approval step is required in addition to entry of test results to indicate final approval or rejection of the tested material. In addition, users will be unable to use the "Finish QC" button when performing testing until the "Approve QC" flag has been checked on the Quality Control Results form. Security exists to control access to Approve QC.
E-Signature approval
The "Require E-Signature For Approval" and "Require E-Signature For Results" flags are available to each Quality Control Group. If checked, a valid Deacom username and password is required to be entered before the “Finish QC” step is allowed or before a QC pass may be entered. A record of this approval is stored in Deacom in an encrypted record (AES-256 encryption like the rest of the system). The Deacom application complies with the FDA requirement (21 CFR 11) for E-Signatures by employing at least two distinct identification components, namely a username and password as indicated in Section 11-200 of the Code of Federal Regulations. Note: Multiple e-signatures may be required for each QC pass via the "e-Signatures Counts" fields.
Approving out of spec QC results
A QC result is considered within specification if the result is between the minimum and maximum values defined on the test. The "Must Pass QC To Continue" flag is an optional setting located on each QC item within the QC group. If this flag is checked, the QC result must be between the minimum and maximum values before the material can be accepted into regular inventory. Security exists that allows users to approve QC results when the results are out of specification. This security is used in connection with the Approve QC security mentioned above.
System Navigation
- Inventory > Maintenance > Quality Control Groups
Edit Quality Control Group form
Opened via the "New" or "Modify" button on the Quality Control Groups form, the Edit Quality Control Group form is used to group together Quality Control Tests that should be performed on a given Part. Information pertaining to the group is configured using the General and User Fields tabs and all QC Tests belonging to the group are listed on the bottom of the form. A couple notes regarding QC Groups include:
- The "un_name" column, which displays the QC Unit of Measure (if populated) is available to this form.
- The "Require E-Signature When Saving A QC Group" flag on the System > Options > Inventory tab will prompt and require a user to enter valid credentials before modifying a QC Group.
- When modifying an existing QC group, including QC tests on the group, the system checks to see if there are open jobs using this QC Group or if there are lots in Pending QC using this QC Group that have QC values already entered.
- If open jobs are found with the QC Group, the system will prompt users asking if they wish to the update the QC Group on these jobs.
- If there are lots in Pending QC using this QC Group that have existing QC values, then the system will list the affected lots, and prompt users that these lots will have their QC values removed and if they wish to Continue. If users choose to continue, QC values will have to be reentered for the affected lots.
Button |
Description |
---|---|
Same As |
Allows the user to copy an existing Quality Control Group to use as a base for the one being created.
|
Add |
Opens the Edit Quality Control Item form, which is used to add a Quality Control Test to the group and assign values and other qualities. |
Modify |
Opens the Edit Quality Control Item form, which is used to modify the selected Quality Control Test. |
Delete |
Deletes the currently selected Quality Control Test. |
Sort |
Allows the user to sort the order of the Quality Control Tests listed. |
General tab
Field/Flag |
Description |
---|---|
QC Group Name |
Defines the name of the group. |
Days Open |
Indicates the number of days after production that QC entry is allowed. |
Approval Type |
Pick list used to indicate when and how approval is required. Options are:
Approval overrides failed tests that are flagged as “Must Pass QC To Continue”. Rejection sends material into Failed QC status, where only approved users have access to it. |
E-Sig Approval Type |
Pick list used to indicate when and how E-Signatures are required.
|
QC Approval E-Signature Counts |
Only used when approving QC to determine how many e-signatures are required. Option to require, and store, multiple e-signatures when approving QC. If the number in this field is greater than 1, the system will display a signature form, requiring an entry, for the number specified in this field.
|
QC Results E-signature Counts |
Used to determine how many e-signatures are needed to enter results.
|
Active |
If checked, this record is active. Only active records may be used in the system. |
Default |
This flag is not used for Quality Control Groups and therefore has no purpose if checked. It is listed only because it is a standard field on forms. |
Complete Empty Tests |
If checked, the system will complete empty tests with empty values and move them to QC list/values form. If not checked, the system will only move tests that have values to the QC list/values form.
|
Require E-Signature For Approval |
If checked, a valid Deacom username and password is required to be entered before the “Finish QC” step is allowed.
|
Require E-Signature For Results |
If checked, a valid Deacom username and password is required to be entered when applying each pass of QC results.
|
Do QC After Production |
If checked, QC is performed after production.
|
Approval Required |
If checked, approval is required for the QC results to be posted. |
Copy Vendor/Pre-Production QC |
If checked, and the “Retain QC” field on the Vendor's General tab is set to “Same Part” or “All”, then the system will automatically populate the QC results when receiving the sameUser Lot for items from this Vendor.
|
Fail To Quarantine |
If checked, Lots that fail QC testing will automatically be failed to the Quarantine inventory segment.
|
User Fields tab
Deacom allows the creation of user-defined fields that, once created, are available on various master data records such as items, Vendors, and Ship-to Companies. These fields allow companies to enter and store information outside of the fields provided in the system. User fields may be added via Tools > Tools Maintenance > User Fields.
- Note: QC Test user fields can be added to the Edit Quality Control form
Work Flow tab
Work Flows, managed via Tools > Maintenance > Work Flows, that are assigned to a QC Group are the associated Sequences that must be completed before it is considered complete. This requires the permission "Quality control -- edit QC Group work flow level 0-9" in Edit User Access to add a Work Flow to a QC Group. A search box with applicable Work Flows allows the user to add the desired Work Flow to the QC Group.
Edit Quality Control Item form
Opened via the "Add" or "Modify" buttons on the Edit Quality Control Group form, the Edit Quality Control Item form is used to manage Quality Control Tests within a Quality Control Group and assign values and other qualities. A few notes regarding the values specified in this form:
- The "Min Value" must be less than the "Max Value", unless the max is 0.
- Tests may be created with a minimum and no maximum, in which case QC results will pass if the result is greater than the minimum and the maximum is set to 0.
- Example: Assume a test has a minimum of 10 and a maximum of 0. The system will enforce only that the result must be greater or equal to the minimum.
- Numbers must be used to accommodate situations where a test result needs to be expressed as "Yes" or "No", "True" or "False", or "Pass" or "Fail".
- In these cases, 0 represents no/false/fail and 1 represents yes/true/pass.
- To enable this option, users may set the minimum and maximum values both to 1.0, in which case 1.0 means yes and any other value means no.
- A "9" may also be added to the "Input Mask" field to ensure only one number is entered for the test result.
Field/Flag |
Description |
---|---|
Quality Control Test |
Search field used to select a Quality Control Test to add to the group. |
QC Test Group |
Search field used to select the Quality Control Security Group that applies to this test. |
Description |
Displays a description of the test, up to 200 characters. |
Target Value |
Memo field used to indicate the target value for the test.
|
Default Value |
Optional, set the default QC Test value in a QC Test setup which will populate by default. Useful if have many simple/optional QC Tests to lessen the burden of entry. |
Min Value |
Indicates the minimum accepted value for the test. |
Max Value |
Indicates the maximum accepted value for the test. |
Min Detectable |
Indicates the default value for a minimum detectable reading, generally used for legal requirements.
|
Print Mask |
Field used for formatting the QC results on forms. When the Print Mask is not used, the Input Mask will be the fallback field used for formatting the QC Results on forms. Input Mask and Print Mask can be used together when users should enter results with 4 decimals, but only display 3 decimals.
|
Input Mask |
Defines the mask, which governs the format, that will be used when entering the results.
|
Aggregate Type |
Pick list used to select which QC value, when multiple iterations of a test are performed, will populate on Part Forms. Options are:
|
Notes |
Memo field used to store notes regarding the test.
|
Required |
If checked, a value must be entered for this test prior to moving the item to inventory.
|
Must Pass QC To Continue |
If checked, a value entered for this test must be between the minimum and maximum defined.
|
Print On Forms |
If checked, the test description, values, and notes will be available for display on Part Forms, including Certificates of Analysis.
|
Prints On POs |
If checked, the test description, values, and notes will be available for display on Purchase Orders.
|
Require Notes |
If checked, users will be required to enter notes for this test, via the "Edit Notes" button on the Edit QC Results form, before results can be saved/applied.
|
Quality Control Security Groups
Quality Control is a major method of providing process control within Deacom. Quality Control ensures that required Quality Control Tests are performed when Raw Materials are received on Purchase Orders, when Finished Goods are produced on production Jobs, and when previously sold products are returned. Quality Control is an optional feature with a wide array of applications ranging from completely turned off to extremely strict requirements, and is established on an item by item basis. This means that some items can have absolutely no quality control, while others can have many required QC tests.
Quality Control Tests are required to do QC testing. The Quality Control Test describes the base name of the test as well as any applicable testing methods and the Unit of Measure that should be used for testing. Quality Control Groups are a list of sequenced Quality Control Tests for the group to perform. QC Groups can be attached to a Part's Item Master to indicate testing required upon PO receipt or on a Bill of Materials to indicate testing required prior to, or following, finishing of material on a production Job. If two items have identical QC Tests and allowable results, they can share the same QC Group. If two items have different QC Tests or different allowable results, they would each have a different QC Group. A system can have as few as one QC Group, or as many QC Groups as there are items, or anything in between. Items may also have multiple QC Groups assigned based on different testing levels. For example, all Raw Materials may be assigned a basic QC Group, with a certain sub set of Raw Materials being assigned an additional QC Group on the Item Master record to ensure these materials undergo additional QC testing requirements.
Quality Control Security Groups are assigned to each Quality Control Test when the test is added to a Quality Control Group. User Groups are then assigned to QC Security Groups using Quality Control Group Security. This grid must be updated whenever a new Quality Control Security Group or User Group is created to ensure the new group has appropriate access. Specific test protocols and security for entering QC data are configured via Quality Control Groups and security for who can enter QC values is configured via Quality Control Security Groups. Additional system security is required to perform functions such as creating or modifying QC Tests and QC Security Groups.
System Navigation
- Inventory > Maintenance > Quality Control Security Groups
Edit QC Security Group form
Opened via the "New" or Modify" buttons on the Quality Control Security Groups form.
Field/Flag |
Description |
---|---|
Name |
Displays the name of the security group. |
Active |
If checked, this record is active. Only active records may be used in the system. |
Default |
If checked, this security group is the default for new Quality Control Tests added to Quality Control Groups. |
Quality Control Tests
Quality Control is a major method of providing process control within Deacom. Quality Control ensures that required Quality Control Tests are performed when Raw Materials are received on Purchase Orders, when Finished Goods are produced on production Jobs, and when previously sold products are returned. Quality Control is an optional feature with a wide array of applications ranging from completely turned off to extremely strict requirements, and is established on an item by item basis. This means that some items can have absolutely no quality control, while others can have many required QC tests.
Quality Control Tests are required to do QC testing. The Quality Control Test describes the base name of the test as well as any applicable testing methods and the Unit of Measure that should be used for testing. Quality Control Groups are a list of sequenced Quality Control Tests for the group to perform. QC Groups can be attached to a Part's Item Master to indicate testing required upon PO receipt or on a Bill of Materials to indicate testing required prior to, or following, finishing of material on a production Job. If two items have identical QC Tests and allowable results, they can share the same QC Group. If two items have different QC Tests or different allowable results, they would each have a different QC Group. A system can have as few as one QC Group, or as many QC Groups as there are items, or anything in between. Items may also have multiple QC Groups assigned based on different testing levels. For example, all Raw Materials may be assigned a basic QC Group, with a certain sub set of Raw Materials being assigned an additional QC Group on the Item Master record to ensure these materials undergo additional QC testing requirements.
Quality Control Security Groups are assigned to each Quality Control Test when the test is added to a Quality Control Group. User Groups are then assigned to QC Security Groups using Quality Control Group Security. This grid must be updated whenever a new Quality Control Security Group or User Group is created to ensure the new group has appropriate access. Specific test protocols and security for entering QC data are configured via Quality Control Groups and security for who can enter QC values is configured via Quality Control Security Groups. Additional system security is required to perform functions such as creating or modifying QC Tests and QC Security Groups.
System Navigation
- Inventory > Maintenance > Quality Control Tests
Edit Quality Control Test form
Opened via the "New" or "Modify" buttons on the Quality Control Tests form.
General tab
Field/Flag |
Description |
---|---|
Name |
Displays the name of the test. |
Test Method |
Describes the approved method to be used for conducting the test. |
Unit Of Measure |
Indicates the Unit used to measure test results. |
Input Mask |
Defines the mask, which governs the format, that will be used when entering the results. Note: The value entered in this field will provide the default to "Input Mask" field on the Edit Quality Control Item form when adding this QC Test to a Quality Control Group.
|
Print Mask |
Field used for formatting the QC results on forms. When the Print Mask is not used, the Input Mask will be the fallback field used for formatting the QC Results on forms. Input Mask and Print Mask can be used together when users should enter results with 4 decimals, but only display 3 decimals. Note: The value entered in this field will provide the default to "Print Mask" field on the Edit Quality Control Item form when adding this QC Test to a Quality Control Group.
|
Combine Results |
Option to have the system compare the values for the selected criteria in this field on lots being relived to production jobs and transfer those values to the lot produced on the job. Options are None, Weighted Average, Average, Minimum, and Maximum.
|
Active |
If checked, this record is active. Only active records may be used in the system. |
User Fields tab
User Fields provide companies with a useful tool to add additional information or selection options via the use of list boxes to master data records and orders throughout the Deacom system. Users can add QC Test User Fields to the Inventory Quality Control Tests grid and can also add QC Test User Fields to the QC INFO and QC PARENT INFO block types on COA reports, and on other Part Forms, including PO Labels. The information entered in User Fields is also available for printing on many of the print outs and labels throughout the system. When using the QCINFO and QC PARENT INFO blocks for PO labels, the default values from the Item Master QC group/tests will be printed on the label.
User Fields must first be created before they will be visible on this tab.
Reason Codes
Reason Codes (or Adjustment Reasons) are available for selection on all inventory adjustment and move forms throughout Deacom and also on many of the inventory reports in Inventory Reporting. Reason Codes are also available to the move form in the WMS application. The Reason Codes list can contain an infinite number of entries. Users with access to the Inventory Maintenance menu will have access to create and modify Reason Codes.
System Navigation
- Inventory > Maintenance > Reason Codes
Edit Inventory Adjustment Reason form
Opened via the "New" or "Modify" buttons on the Adjustment Reasons form.
Field/Flag |
Description |
Name |
Name of adjustment reason, which must be unique. |
Inventory Adjustments |
Search field used to define an adjustment account for the selected reason.
|
Active |
If checked, this record is active. Only active records may be used in the system. |
Default |
If checked, the selected reason is the default when Adjusting Inventory. Users may override the default if necessary.
|
Routings
A Routing in the Deacom system is a series of predefined processing steps, listed in order of sequence, necessary to complete a Part. Each Routing step indicates the Work Center, the Operation that will be performed, and the processing rate for the item in units per hour. Each Routing step has a cost per unit based on the standard operation Labor rate, the Work Center’s hourly cost, and the processing rate. The sum of all the Routing step costs is the total Labor Cost per piece, which is stored in the "Current Labor" field of the Item Master Costs tab. Routings are attached to individual BOM Revisions, which allows for different manufacturing processes for different BOMs.
In addition to the Routings section in Inventory Maintenance, Routings can be created and maintained on the Routings tab in the Bills Of Material or the Item Master areas of the system. The security setting "Item master -- edit routing" controls access to this transaction in all locations. For information on how to configure Routings, refer to the Managing Routings page.
Additional notes regarding Routings include:
- If modifying a Routing via the "Routings" button on the Job, any changes are made for the Job only and do not impact the Routing group. These changes will be a variance from the standard cost.
- If an item is a Feature part and modified by the Configurator after the Job is created, Routings are not automatically updated, but can be manually updated if needed.
- Jobs must be saved before users can modify their Routings.
- Operations for Jobs due on a certain day that are not scheduled are shown at midnight on the Planned On Hand Calendar view.
- Example: A Job is created with Routings that are not scheduled, but the Job is due 5/29. On the Planned On Hand Calendar, these Routings will show at midnight on 5/29 for both "Date Based On" of Start and End.
- When automatic scheduling of routings occur, the system will sort the routings by line number then by routing sequence. In addition, the system will check to see if the next line in the routing uses the previous line in its BOM. If it does, the system will pull in the route time so it does not conflict.
System Navigation
- Inventory > Maintenance > Routings
Edit Routing form
Opened via the "New" or "Modify" buttons on the Routings form, the Edit Routing form lists all Operations that are assigned to the selected Routing along with several details, such as the associated Work Center, Units, and Hours (specified via the Edit Routing Sequence form) and the following:
- Machine Cost - Calculated as Work Center Hourly Rate (ce_rate) * Routing Hours (r2_hours).
- If r2_batch is true and ro_size <> 0, then use ro_size; Otherwise return 0 for the whole calculation.
- If r2_batch is false and r2_pieces <> 0, then use r2_pieces; Otherwise return 0 for the whole calculation.
- Labor Cost - Calculated as Operation Cost ($/hr) * Sequence Hours (hr) / Sequence Units (unit).
- Piece Cost - Cost associated with manufacturing one Unit of the selected item.
Note: Documents attached to the Routing can be printed when using Document Groups by selecting the "Routing" option in the "Print Attached" field on the Document Group master record.
Button/Flag |
Description |
---|---|
Add |
Opens the Edit Routing Sequence form, which is used add a Sequence to the Routing. |
Modify |
Opens the Edit Routing Sequence form, which is used to modify the details of the selected Sequence. |
Delete |
Deletes the selected Sequence from the Routing. |
Sort |
Allows the user to sort the order of the Sequences for this Routing. |
Same As |
Allows the user to copy an existing Routing as a starting point, which can then be modified and saved as a new Routing. |
Copy Seq |
Allows the user to copy the currently selected Routing Sequence.
|
Copy Routing User Fields |
If checked, when using the Same As feature the user fields on the routing sequence get copied over; if not checked values will not copy. |
General tab
Field/Flag |
Description |
---|---|
Name |
Displays the name of the Routing, which must be unique. |
Batch Size |
Indicates the typical number of units produced using this Routing. |
Facility |
Indicates the Facility for which this Routing is used. |
Active |
If checked, this record is active. Only active records may be used in the system. |
Recalc Batch Std. Labor and Burden by Planned Quantity |
If checked, and "Inventory Costing" in System > Options > Inventory tab is set to "Standard Cost" or "FIFO Cost", labor and burden postings are re-calculated based on the Job's planned quantity (lj_planquant) as opposed to the batch size entered on the routing.
|
Schedule Continuously |
If checked, indicates this sequence should be scheduled together with other sequences on the same routing and without any gaps. A gap might be another routing sequence, blackout, or open space. This field applies when scheduling routing sequences manually or automatically (earliest, latest, etc.).
|
MRP tab
Field/Flag |
Description |
---|---|
Use MRP Settings |
If checked, the system will adhere to the values on this record when this Routing is selected on Jobs when running MRP. |
Job Minimum |
Used in conjunction with the "Split MRP Jobs By Job Quantity" flag on the Item Master Properties tab to define the default minimum batch size, in Stock Units, for produced materials.
|
Job Maximum |
Used in conjunction with the "Split MRP Jobs By Job Quantity" flag on the Item Master Properties tab to define the default maximum batch size, in Stock Units, for produced materials.
|
Incremental Job Qty |
Used in conjunction with the "Job Minimum" and "Job Maximum" fields to define the increment at which Jobs for this Part/Routing combination must be created and therefore constrain Job quantities to a multiplier.
|
User Fields tab
Deacom allows the creation of user-defined fields that, once created, are available on various master data records such as items, Vendors, and Ship-to Companies. These fields allow companies to enter and store information outside of the fields provided in the system. User fields may be added via Tools > Maintenance > User Fields.
Edit Routing Sequence form
Opened via the "Add" or "Modify" buttons on the Edit Routing form. When editing a Routing for a specific Job via the "Routing" button on the Job, several additional fields are available:
- Due Date and Due Time - Define the date and time the materials are due for the Job.
- Pieces - Defines how many outputs or pieces are needed to complete the Operation.
- Planned Hours - Indicates how long the task should take to complete, which allows the system to compare the actual hours/dollars to the planned hours/dollars.
- The Job Reporting "Job Cost Summary" report uses this field to calculate the standard labor.
- When modifying an existing Job Routing, this field is read only.
General tab
Field/Flag |
Description |
---|---|
Operation |
Search field used to select the Operation, which supplies the standard hourly labor cost, for which this Routing is used.
|
Restrict To Work Center |
Pick list used to determine if the selected Operation should be restricted when a user attempts to manually modify the Work Center on a Job Routing Step from the Job header. Options are:
|
Units |
Defines how many outputs or pieces will be completed by the Operation in the time specified in the Hours field. If the "Batch" flag is set, this field will be grayed out. |
Hours |
Defines the amount of time required to complete the Operation. If the "Batch" flag is set, this operation will take the same amount of time for all jobs. Batch size or job size will not be considered. |
Crew Size |
Defines the number of Workers required to complete all Units within the Hours entered on the Sequence.
|
Lead Time Based On |
Pick list used to dictate if the "Lead Time" will be based on the Start or End of the Job. |
Lead Time |
Used in conjunction with the "Lead Time Based On" selection and the Master Production Calendar to indicate the lead time, in hours, for this Sequence.
|
Unavailable For Next Sequence |
If checked, the Work Center using this routing sequence on the Master Production Calendar will be unavailable for scheduling based on where and when Operations on subsequent sequences occur. |
Notes |
Memo field used to store processing notes specific to this Sequence. |
Batch |
Used to indicate if the Operation being performed takes a set amount of time regardless of the "Batch Size" defined on the Routing.
|
Finishing |
Used to indicate if this Routing Sequence is a finishing step.
|
Schedule Around Blackouts |
Checked by default. When checked, routing sequences will be scheduled on the Master Production Calendar over non-maintenance blackouts. Routing sequences will be scheduled to start before a blackout and then continue thereafter.
|
Include in Optimization |
Used to indicate if the sequence is susceptible to the Optimize function in the Master Production Calendar. Defaults to True. When set to False, the selected sequence will remain in its initially scheduled time even if the Optimize function is used. |
Zero Cost |
When checked, all machine, labor, piece, etc. costs will be set to zero and not appear in any labor cost roll ups. |
Operation Complete |
Only available when editing/adding Routing Sequences in Job Reporting. Used for reporting purposes to indicate that this operation, for the selected job, is complete.
|
Work Center tab
The Work Center tab lists all Work Centers and pertinent information to which the selected Sequence covers. At least one Work Center must be added to a Routing to save it.
Edit Routing form
Field/Flag |
Description |
---|---|
Work Center |
Search field used to select the Work Center, typically a specific machine within a given Shop Area, to which this Routing and the values below apply.
|
Units |
Defines how many outputs or pieces are needed to complete the Operation for the selected Work Center. If the "Batch" flag is set, this field will be grayed out. |
Hours |
Defines the amount of time required to complete all Units for the selected Work Center. |
Crew Size |
Defines the number of Workers required to complete all Units within the Hours entered on the Sequence for the selected Work Center.
|
Lead Time Based On |
Pick list used to dictate if the "Lead Time" will be based on the Start or End of the Job. |
Lead Time |
Used in conjunction with the "Lead Time Based On" selection and the Master Production Calendar to indicate the lead time, in hours, for this Sequence for the selected Work Center.
|
Notes |
Memo field used to store processing notes specific to this Sequence for the selected Work Center. |
Inherited |
If checked, will inherit the units, hours and crew size from the values on the General tab. |
Default |
If checked, this is the default Routing when this Operation is performed on the selected Work Center. |
User Fields tab
Deacom allows the creation of user-defined fields that, once created, are available on various master data records such as items, Vendors, and Ship-to Companies. These fields allow companies to enter and store information outside of the fields provided in the system. User fields may be added via Tools > Maintenance > User Fields.
Schedule Sequencer 1-2
Scheduling Sequencers are used by the optimization wizard located on the toolbar of the Master Production Calendar and provide planners with an option to prioritize how items on active production Jobs should be scheduled. Two sequence levels are available and each item may be assigned to one Schedule Sequence 1 and one Schedule Sequence 2. The optimization wizard will search for items assigned to level 1 sequences first, then assign Jobs containing these items to the appropriate Work Center or Shop Area. Next, the optimization wizard will search for items assigned to level 2 sequences (after items with level 1 sequences have been assigned) and then assign Jobs containing these items to the appropriate Work Center or Shop Area.
Once scheduling sequences have been created they may be selected via the search boxes in the "Schedule Sequencer 1" and "Schedule Sequencer 2" fields located on the Item Master General 1 tab. In situations where scheduling sequences need to be assigned to multiple Item Master records, the spreadsheet option in the "Change From" field via Inventory > Price Updates may be used.
Note: The schedule sequencer 1 option can also be used with the scheduled changeover feature.
System Navigation
- Inventory > Maintenance > Schedule Sequencer 1-2
Edit Schedule Sequencer 1-2 form
Opened via the "New" or "Modify" button on the Schedule Sequencer 1-2 form.
Button/Field/Flag |
Description |
---|---|
Name |
Defines the name of the schedule sequencer. |
Active |
If checked, this record is active. Only active records may be used in the system. |
Sort |
Used to change the sort order of the Schedule Sequences in the list, which appears in the search box in the "Schedule Sequencer 1-2" fields on the Item Master General 1 tab. |
Sub-Categories
Inventory Sub-Categories allow companies to further group items that share similar characteristics and are useful for inventory reporting purposes. In addition, Sub-Categories are one of the criteria for Deal Pricing, Promotions and Commissions. Categories may contain multiple Sub-Categories but only one Sub-Category may be assigned to an item. Users with access to the Inventory Maintenance menu will have access to add and modify Sub-Categories.
Sub-Category names only have to be unique within their own Category and not throughout all Categories.
System Navigation
- Inventory > Maintenance > Sub-Categories
Edit Sub-Category form
Opened via the "New" or "Modify" buttons on the Sub-Categories form.
General tab
Field/Flag |
Description |
Features |
If clicked, displays the Features form, which is used to manage sales features applicable to this Sub-Category. Features, used in connection with the Deacom Product and Sales Configurator, are a group of similar options that may be chosen or configured based on different sales choices. |
Category |
Search field used to select the Category to which the Sub-Category will be assigned.
|
Sub-Category |
Displays the name of Sub-Category, which must be unique within one Category.
Category Sub-Category Candies Chocolate-Covered Pretzels Chocolate-Covered |
Sales Quota |
Stores the planned annual sales in dollars for the selected Sub-Category.
|
Active |
If checked, this record is active. Only active records may be used in the system. |
Restricted Selling |
If checked, indicates this is a restricted Sub-Category. Restricted selling may be used in a few different ways. |
Deacom allows the creation of user-defined fields that, once created are available in various master data records, such as Items, Vendors, Ship-To-Comapnies and many others. These fields allow companies to enter and store information outside of the fields provided in the system. User fields can also be used in connection with User Calculations to and are available for printing on the majority of Part Forms and Report Layouts throughout the system.
Units tab
The Units tab allows companies to define the number of minutes required per unit to receive and ship items in the selected sub-category and is used in conjunction with the Dock calendar to schedule orders. Note: Unit Minutes may also be defined on individual Units of Measure, Item Masters, and Categories, allowing companies to define a hierarchy for the minutes that will be required for receiving and shipping.
Button/Field/Flag |
Description |
Unit Of Measure |
Select an appropriate Unit of Measure from the drop down list. |
Receiving Minutes |
Numeric field used to define the minutes required to receive the Unit of Measure when receiving items in the specified Unit Of Measure that are assigned to this Sub-Category. |
Shipping Minutes |
Numeric field used to define the minutes required to ship the Unit of Measure when shipping items in the specified Unit Of Measure that are assigned to this Category. |
Features form
Opened via the "Features" button on the Edit Sub-Category form. Displays a list of the Features that have been added to the Category.
Button |
Description |
Add |
If clicked, opens the Edit Feature form and allows the user to select a Feature.
|
Overrides |
If clicked, opens the Feature Overrides form, which displays a feature tree of this Sub-Category and all available options and prices, with the capability of overriding pricing and availability.
|
Inclusions |
If clicked, opens the Feature Inclusions form, which displays a list of the inclusions and exclusions that have been added to the current Feature. |
View Tree |
If clicked, displays a feature tree of the selected Feature and all attached options and prices, which can be printed or exported to Excel. |
Units of Measure
In Deacom, unit conversion factors are stored centrally in the Unit of Measure table. The advantage of this setup is that the conversion factor can be noted once instead of multiple times in the Item Master setup. Additionally, since the conversion factor between units is established, the purchasing and sales functionality in Deacom is no longer limited to operating with the Item Master’s Unit of Measure. The setup of the unit of measure conversion factors affects Items Masters, Purchase Orders, Sales Orders, BOM maintenance, and production Jobs.
In addition, the amount of time it takes in minutes to prepare a specific Unit of Measure for shipment, or the amount of time it takes to unload a specific Unit of Measure, can be specified on the Unit of Measure record. This feature supports the Dock scheduling capability within Deacom.
Base Units
Each type of unit (each, cube, length, volume, or weight) must have a single base unit of measure established in the form, which will be used for all conversion factors. This base unit is selected by checking the "Base Unit" flag on the Edit Unit of Measure form. All the base units should have the "Factor" set to 1. Additional units of measure created with conversion factors are known as derived units.
For organizations who work primarily in imperial units, the base unit for volume and weight will be gallons and pounds, respectively. For example, if the base unit for weight is pounds, then the conversion factor for the kilogram unit will be 2.2046 because there are 2.2046 pounds per kilogram.
For the purpose of purchasing and sales packaging where package items are not being used in Deacom, boxes, bags, drums, pails, and other types of packaging can be defined as containing a certain number of base units. For example, a Unit of Measure can be setup called “Box - 20 lb”. Every possible packaging type that requires conversion must be present in the Unit of Measure table.
Example setups
Below are examples of how the Unit of Measure table can be setup in Deacom for both Imperial Standard and Metric.
Imperial Standard |
Metric |
||||||
Name |
Type |
Factor |
Base Unit |
Name |
Type |
Factor |
Base Unit |
Each |
Each |
1 |
Yes |
Each |
Each |
1 |
Yes |
Box - 12 |
Each |
12 |
No |
Box - 12 |
Each |
12 |
No |
Case - 24 |
Each |
24 |
No |
Case - 24 |
Each |
24 |
No |
Feet |
Length |
1 |
Yes |
Meter |
Length |
1 |
Yes |
Yard |
Length |
3 |
No |
Centimeter |
Length |
.01 |
No |
Inch |
Length |
.08333 |
No |
Kilometer |
Length |
1000 |
No |
Gallon |
Volume |
1 |
Yes |
Liter |
Volume |
1 |
Yes |
Quart |
Volume |
.25 |
No |
Centiliter |
Volume |
.01 |
No |
Pint |
Volume |
.125 |
No |
Kiloliter |
Volume |
1000 |
No |
Pound |
Weight |
1 |
Yes |
Gram |
Weight |
1 |
Yes |
Gram |
Weight |
.00220462 |
No |
Centigram |
Weight |
.01 |
No |
Kilogram |
Weight |
2.20462 |
No |
Kilogram |
Weight |
1000 |
No |
MBF |
Cube |
1 |
Yes |
Cubic Meter |
Cube |
1 |
Yes |
BF |
Cube |
.001 |
No |
Cubic Centimeter |
Cube |
.000001 |
No |
Cubic Feet |
Cube |
.0120004 |
No |
Cubic Kilometer |
Cube |
1,000,000,000 |
No |
Lumber
Lumber is normally stocked by the stick, with pricing by the MBF. MBF is defined as the base unit for the Cube UOM. As the base unit, the factor is 1.00. The pricing factor is on the "Unit Cube" field of the Item Master Calcs tab. If a Pricing factor is set to show that each stick equals 0.012 MBF and 1,000 sticks are purchased at the cost of $420 per MBF, then the following two equations can be used to determine the correct extension:
- Order Amount in Stock Unit x Pricing Factor from Unit Cube = Order amount in Stock Pricking Unit (In this case, 1,000 pieces x 0.012 MBF per piece = 12 MBF.)
- Order Amount in Stock Pricing Unit x Purchase cost = Extension (In this case, 12 MBF x $420/MBF = $5040.)
This transaction would put 1,000 sticks into inventory, at the cost of $5,040 for the load. Divided by 1,000 sticks, the total shows that the individual Lot cost is $5.04 per stick. The GL transaction of the receipt would put the $5,040 into inventory, crediting AP Suspense for the same amount. If done in standard cost mode, and the purchase price are the same as the standard cost, so there would be no purchase price variance.
Weight to volume and volume to weight conversions
While the relationship between one weight unit and another, like pounds and kilograms, or one volume unit and another, like gallons and liters, is constant and can be stored in the Unit of Measure table, the relationship between weight and volume is different from one item to the next, and must still be stored on the Item Masters Calcs tab. The Calcs tab contains the conversion factors, for a specific item, between weight, volume, cube, and length. The five fields on the tab used for weight to volume and volume to weight conversions are as follows: Unit Weight, Unit Volume, Unit Cube, Unit Length, and Tare Weight.
System Navigation
- Inventory > Maintenance > Units of Measure
Edit Unit of Measure form
Opened via the "New" or "Modify" buttons on the Units of Measure form.
General tab
Field/Flag |
Description |
Name |
The name of the Unit of Measure. |
Type |
Pick list used to define the measurement type. Options are:
|
Factor |
Defines the conversion factor used by the UOM flagged as "Base Unit" for the same "Type".
|
Shipment Mins |
Defines the time in minutes that it takes to load a "Sales Unit" defined on the Sales Order line.
|
Receipt Mins |
Defines the time in minutes that it takes to unload a "Purchase Unit" defined on the Purchase Order line.
|
FedEx Unit |
Pick list required if using the FedEx API used to select the unit that will be used to measure shipments.
|
FedEx Factor |
Defines the conversion factor.
|
EDI Code |
Defines the standard EDI code used for the Unit of Measure. The most commonly used codes are indicated below. Please note this is not an all inclusive list.
|
Base Unit |
If checked, the selected UOM is the base unit for the designated measurement "Type".
|
Active |
If checked, this record is active. Only active records may be used in the system. |
Default |
If checked, the selected UOM is used as the default when new Parts are created. |
Restrict Sales Picking to Container Units |
If checked for a sales unit, the user will only be allowed to pick Lots with the matching container unit when reserving and shipping in both the main app and when reserving in WMS. |
Deacom allows the creation of user-defined fields that, once created are available in various master data records, such as Items, Vendors, Ship-To-Comapnies and many others. These fields allow companies to enter and store information outside of the fields provided in the system. User fields can also be used in connection with User Calculations to and are available for printing on the majority of Part Forms and Report Layouts throughout the system.
Vehicles
System Navigation
- Inventory > Maintenance > Vehicles
Vehicles form
Edit Vehicles form
Button/Flag |
Description |
Name |
Enter name of vehicle |
Facility |
|
Active |
Check to make the vehicle active |
Zones
Zones represent a series of inventory locations. When setting up a warehouse in Deacom, customers can do so by Zone to improve the efficiency of picking for both Jobs and Sales Orders. Zones are comprised of specific Locations within the warehouse and often have operators assigned directly to the Zone for picking purposes.
Considering warehouse hierarchy, Zones are optional. While Facilities, Location Types, and Locations are required within Deacom, customers have the option of whether or not to take advantage of Zones through the configuration process. One helpful use of Zones is in situations where large orders require more than one person to pick for the order. For example, if the warehouse is set up by aisles A-Z, one person can pick in aisles A-D (Zone A to D) and another person can pick in aisles E-J (Zone E to J), etc.
As mentioned above, there are also restrictions available by Zone. The "Zone" field on the Facility Item form, available on the "Facilities" tab of the Item Master record, restricts what inventory can be received to only Locations within the destination Location's Zone. This is useful for situations where companies need to restrict items to certain areas of the warehouse. For example, certain materials can only be stored in the cooler. This "Zone" field on the Facility item will direct users to the cooler and not allow users to move this product into a non-cooler Location. Only available in web versions of Deacom. Also, when a user is restricted to a Zone, they can only issue, pick, and ship (without assigning lots) from within their Zone. Specifically, issuing, reserving, shipping, moving, staging, and receiving (on negative Purchase Orders) inventory should limit the lot chooser to only seeing lots from the specified Zone. Scanning a lot should confirm that the lot is in that Zone. This essentially breaks down to inventory that is in Locations that are in the User's Zones.
System Navigation
- Inventory > Maintenance > Zones
Edit Zone form
Opened via the "New" or "Modify" buttons on the Zones form.
Field/Flag |
Description |
Name |
Name of the Zone, which must be unique. |
Facility |
Pick list used to select the Facility that the Zone will belong to. Multiple Zones may be assigned to one Facility. |
Part |
|
Active |
If checked, this record is active. Only active records may be used in the system. Note: After inactivating Zones, scanner users must log out then back in to Deacom to refresh the Zones list. |
Default |
If checked, this will be the default Zone on forms throughout the system that contain a "Zone" field. Users may override the default if necessary. |
Prevent Inventory Transactions |
If checked, prevents inventory transactions (issuing, reserving, moving) other than physical inventory postings from occurring for this record. This flag should be selected during physical inventories to ensure that no transactions occur between the time the inventory snapshot is taken and the time when the physical inventory worksheet is posted. When this flag is checked, if a user attempts to perform inventory transactions in the system for the Zone, a system prompt will be displayed to prevent the transaction from occurring. Note: This flag also exists on Item Master records, Facilities, Locations, and Location Types. Also, when the "Automatically Prevent Included Item Transctions" field on the Physical Inventory Forms form is checked, this prevents users from performing inventory transactions on all items, or facility-specific items, if a Facility is indicated on the form when performing a physical inventory or cycle count. The field allows companies to more quickly prevent inventory transactions then using the alternative option of checking the "Prevent Inventory Transaction" flag on the item master record, either individually, or via the Price Updates Excel feature. |
Edit Location form
Opened via the "Add" or "Modify" buttons on the Edit Zone form.
Field |
Description |
Location |
Pick list used to select the Locations that will belong in this Zone. A blank value for location is not allowed, but the use of the name “None” is valid. |